Companion Planting: From Edible Flowers to the Three Sisters

PWM_CompanionPlanting.jpg

Companion planting is the practice of organizing plants so that they benefit one another, contribute to the health of the soil, and create an environment for both plants and critters to thrive. It works to mirror what takes place in nature to create a replica of that environment in the garden. I have found companion planting to help me maximize my growing space, minimize harmful pests, build healthy soil, and increase beneficial insects, pollinators, and birds.

Just like humans, some plants get along and others don’t. For example, potatoes seem to be controversial as they take up a lot of space underground, which compete with other plant roots. Garlic and onion are aromatic that is helpful in deterring unwanted pests but can stunt the growth of peas. Sunflowers attract bees, butterflies, and birds but can establish territory through a process call allelopathy that can hinder the growth of other plants. Beans add nitrogen to the soil, borage acts as a decoy for aphids, and mint deters cabbage moths.

The more I learn about companion planting, the more awe and respect I have for the inner-workings of what nature already knows and does. However, it can also be overwhelming and information overload, so I have done my best here to take what I have learned to make it readily accessible to put to practice whether in a patio container garden or raised beds.

Through my own gardening adventures and research, I have created a companion planting chart, one of my favorite features is that each item from flower to herb to fruit to vegetable is edible (yes, edible flowers)! I have grown almost all of the plants in the chart or they are on my list to grow this year, which means it isn’t comprehensive but includes many of my favorites. It is a large list of plants and even though I created it, I can get overwhelmed, so make sure to read the tips before getting started. To download my Companion Planting Chart by PWM for free, head to my shop.

Here are some of my favorite companion plants and tips:

flowers

PWM_Companion Planting_Marigold.jpg
  • marigolds: these often get dismissed because they are not considered as pretty as other flowers, but they are a must-have companion plant for any size garden. They attract beneficial insects, deter unwanted pests, and help keep beneath the soil nematodes away. They are great for planting along the edges and borders of vegetable gardens and get along with most plants. Their musky smell can compete with other aromatic herbs and flowers, so just keep them spaced out a bit. Make sure to give them some space between beans and brassica family plants.

PWM_Companion Planting_Borage.jpg
  • borage: this became a quick favorite last season as it is a highly productive plant, the flowers and leaves are both edible, and it acts as a decoy for aphids. This means that the aphids find a home with borage instead of with tomatoes, but the borage isn’t harmed by the aphids. The blue flowers have a cucumber-like taste and are beautiful on flowers, in cocktails, or on desserts. The leaves are best when young and tender, but work well combined in salads, soups, are as any green, made into pesto. The plant can grow large, so don’t make the mistake I did and plant it within inches of your tomato plant, instead give it some room between neighboring plants.

PWM_Companion Planting_Calendula.jpg
  • calendula: this edible and medicinal flower will produce well into the Fall, has mostly bright orange and yellow flowers, and repels hornworms, beetles, and moths. I’ve found research to show that the roots can help in the removal of certain toxins from the soil, but since I’m not a scientist I have not actually tested this. Although the petals are edible, whether raw or cooked, they are more often used as a natural dye or the whole flower head is dried and used medicinally in oils and creams. I haven’t found calendula to have any garden foes, so I generously plant this throughout my all my gardens.

PWM_Companion Planting_Nasturtium.jpg
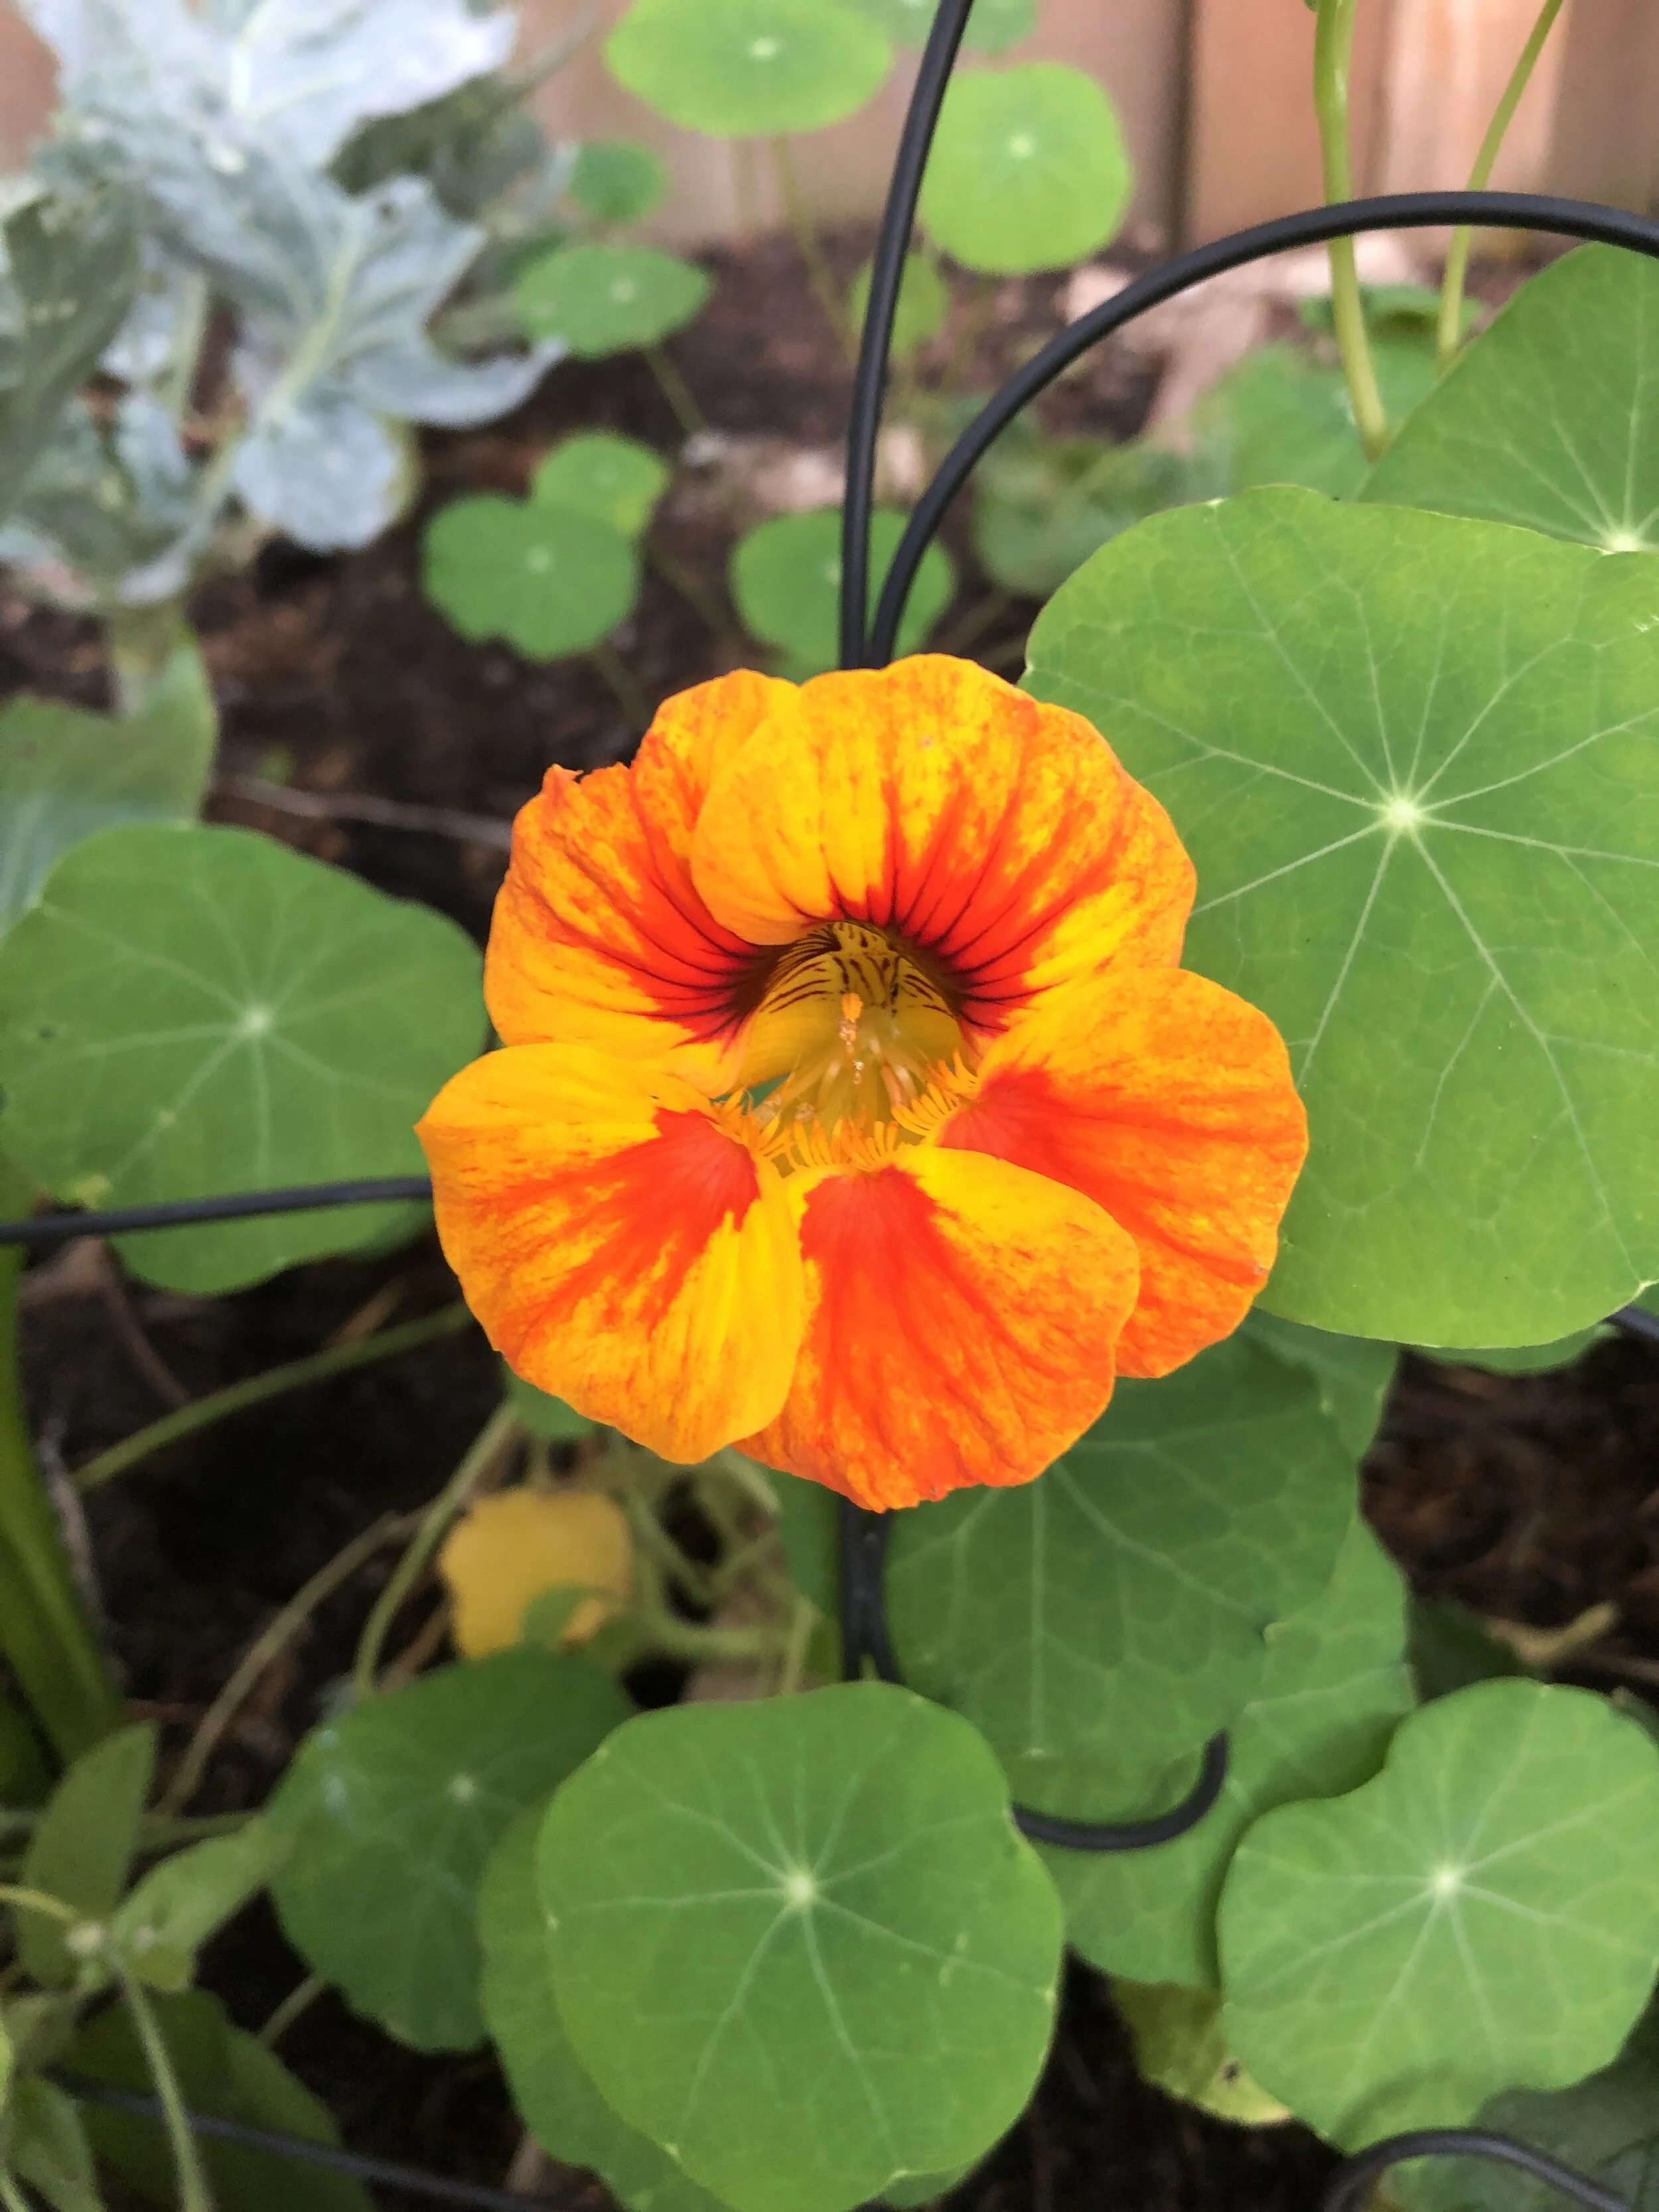
  • nasturtium: this vining plant can be jump started early indoors and act as a climber or semi-ground cover throughout the garden. It attracts hummingbirds and repels pests like aphids, beetles, and squash bugs. Like borage, aphids will be attracted to nasturtium instead of the neighboring plants but won’t be impacted. The flowers are edible and can be stuffed like squash flowers. My favorite aspect of nasturtiums are the round shape of their leaves, they remind me of something a bit tropical or lily pads. I haven’t found any garden foes, so I inter-plant nasturtiums throughout my garden.

herbs

PWM_CompanionPlanting_Chive.jpg
  • chive: this is one of the staple herbs in my garden that I inter-plant throughout all my beds. Their garlicky-onion smell helps repel pests and is said to improve the flavor of neighboring plants, especially carrots and celery. They are a cut-and-come-again perennial, which means the more you cut they more they grow and will return year after year. I usually leave some uncut and let go to flower because their purple petals are a pretty addition to the garden, as well are delicious themselves. Last year I made a chive-flower vinaigrette that was delicious on green and potato salads. Give chives some distance from beans or peas, but otherwise can be planted throughout the garden.

  • dill: this is one of my favorite herbal companion plants, I also like the whimsy of the plant’s leaves. Dill is excellent to inter-plant with the brassica family, especially cabbage as it attracts parasitic wasps that prey on cabbage worm. I have been challenged growing it from seed, so purchasing starts that are a slow-bolting breed is recommended. Also, keep it away from carrots and tomatoes, they are non-companions. Fresh dill is delicious in summer potato salads, garnish for fish, or used in salad dressings.

PWM_CompanionPlanting_Sage.jpg
  • sage: this herb has culinary and medicinal uses, but not all sage plants are edible, some are used as ornamentals and for the flowering aspect to attract pollinators. I incorporate a variety of sage into my garden and although I love the pretty flowers, my favorite is garden sage for its pungent smell and culinary use. Homegrown dried sage saved for cooking with during the holidays is delicious! Common (or garden) sage repels cabbage moth, carrot fly, and beetles. Aside from cucumbers, it can be inter-planted with other garden plants. I often plant sage similarly to marigolds, as a border plant.

  • lemongrass: this is not a plant I commonly see gardeners grow, but I grow it every year. Its aromatic properties help repel mosquitoes, so when inter-planted with lavender, mint, and marigolds on the patio it can help keep some of those annoying pests away. It can be inter-planted with fruit trees, flowers, and vegetables; it just needs full sun. It adds texture and dimension to the garden and adds flavor to the kitchen. I grow this from seed, but most nurseries will care a small selection of starts. Just watch out, pets love to eat this plant!

veggies

PWM_CompanionPlanting_Bean.jpg
  • the three sisters: corn, bean, squash: this is a companion planting trio used first by Native Americans and First Nations. The stalk of the corn acts as a trellis for the bean, the bean adds nitrogen to the soil, and the squash leaves act as a protective cover to the soil while also deterring pests. Corn and beans need vertical growing space while squash needs sprawling space, so this trio is best for in the ground or raised bed gardening. I grow as many beans as possible and can them to use throughout the winter and give as gifts. Zucchini is a prolific squash so just one or two plants is all you need. All three of these can be directly seeded into the ground next to each other, I often start these seeds indoors to give them a jump start. Non-companions for this trio include onion, potato, and tomatoes.

PWM_CompanionPlanting_Cucumber.jpg
  • cucumber: this is one of my favorite plants to have in the garden each year because they use little space, trellis vertically, and are great fresh or canned. They can sensitive to their surroundings so planting them with the right companions can support their growth. They do well with cabbage, carrot, lettuce greens, onion, and more. Just keep them away from potato and aromatic herbs, like oregano and sage. Canning to make your own pickles is popular with gardeners, just make sure to grow pickling cucumbers if you want to do this. Slicing cucumbers are great fresh.

PWM_CompanionPlanting_Tomato.jpg
  • tomato: this is a plant in the nightshade family, a term you’ll often see in companion planting resources. Tomatoes love sun (and warm soil) and do well with carrot, onion, basil, nasturtium, and most other nightshades. Corn, dill, fennel, and potato are non-companions, so keep them in different parts of the garden (this could even mean just a several feet apart from my experience). Aphids will often attack tomatoes so planting borage or nasturtium near by will help. Tomatoes grow up and out so companion plants need to be planted near but not directly next to the tomato plant so that everyone has enough room. I love drying cherry tomatoes and making marinara. Gardeners often grow and can tomatoes for use throughout the winter.

The companion planting list goes on and on. If you are newer to food gardening, pick a few plants that you want to grow, identify their companions, and start there. Trying to grow the list from the whole chart could be overwhelming and turn into more work and food waste than hoped for, so starting with your few favorites is best. Remember that soil, water, and sunlight are three key ingredients to successful growing no matter if you following companion planting practices or not. So first start with making sure those three ingredients are in place, then start adding your plants.

I love companion planting and can’t imagine growing food in any other way. This year I am excited to experiment a bit more with it as I move from keeping the crops in block or row-like sections next to their companions, to weaving them together. Nature has a lot teach us about what works or doesn’t work, so your plants will tell you if they like who they are planted next to, if their soil has the nutrients they need, or if they are thirsty for some water. Happy companion planting!

#GrowFoodTogether : Tips and Ideas for Growing Your Own Food

Growing food can take many forms that can be made to fit into any space, whether that be a windowsill, patio, or backyard. Whether you are a first-time gardener or have been growing for years, let’s #GrowFoodTogether this Spring!

Here are some of my favorite ways to grow food:

Windowsill Microgreens

This is a mix of red and green daikon radish microgreens.

This is a mix of red and green daikon radish microgreens.

Microgreens sprout within a couple days and can be ready to harvest within a week. Microgreens come in a lot of different varieties like arugula, kale, mustard, cilantro, and my favorite radish. My favorite shop to buy microgreens from is Johnny’s Seeds. I use flat plant containers with plenty of drainage, but any pot of any size will work. I suggest a potting or compost mix of soil, I use compost so that after harvest I can mix it in with my other soil and reuse it. Generously sprinkle the seeds on the surface of the soil, water, and lightly cover with a dusting of soil. Keep the soil moist to slightly damp, how often you water will depend on the environment and type of soil; a good schedule for microgreens can be to water lightly every other day. I harvest my microgreens on an as-needed basis by snipping them just above the surface of the soil, this allows any young sprouts to keep growing. Rinse and enjoy! We eat microgreens on their own as a salad or as a garnish for sandwiches, wraps, soups, or mixed in with other greens.

Container Herbs & Edible Flowers

This container includes dwarf curry, lingonberry, french thyme, and rosemary surrounding a lemon cypress.

This container includes dwarf curry, lingonberry, french thyme, and rosemary surrounding a lemon cypress.

Earlier this month I participated in an event called Container Wars, the object of the competition was to put together three containers in less than 30 minutes with a few twists added in. The biggest challenge of the competition for me was not having enough edible plant options to mix into my containers, such as herbs. My goals is to have as many plants (not in my shade garden) to have a culinary or medicinal purpose while still looking pretty. For me, containers are like an outdoor spice rack, both literally and figuratively. I love collecting spices and pack as many as possible into our spice cupboard; similarly, I love packing as many plants as possibly into a container because they can always be pruned back or transplanted to another location. Packing containers full of both perennial and annual herbs and edible flowers is functional and aesthetic. Herbs are aromatic and containers often are placed around sitting or walking areas, thus adding to the experience of the garden. Rosemary, thyme, oregano, chives, parsley, cilantro, calendula, lavender, and chamomile are some of the staples in my container garden. This year I’m adding more edible flowers, like bachelor’s button, hyssop, and echinacea, and trying new herbs, like curry. Some herbs can be tricky to start from seed, so a trip to your local nursery can get you some solid starts, plus then you can look at their texture and smell their fragrance before committing. Think about your spice cabinet and culinary style when picking out herbs, you’ll get far more use out of them if they are already something you love using in the kitchen. When arranging a container, I like to think about having varied heights, mixing in shades of greens, adding plants that will flower and color. I like to mix perennials and annuals so that I can be sure to have some year-round herbs and plants growing. Remember, containers can go in any patio, porch, living room, or garden...so it doesn’t matter what size space you have when it comes to container gardening.

Vertical Gardening

Sunset runner beans growing vertically on a trellis and then following twine to create a canopy over the walkway to the greenhouse.

Sunset runner beans growing vertically on a trellis and then following twine to create a canopy over the walkway to the greenhouse.

This method for growing food is becoming more and more popular as we continue to look at creative ways to maximize the use of space. Some of the most common vertical gardening methods is to grow strawberries in towers and troughs. Trellising plants, like cucumbers and squash has also been a bit trendy but I usually save my large trellises for peas, beans, and cucamelons, and use smaller trellises to support cucumbers and other smaller plants needing support. I have yet to dive into vertical gardening, but if you check out my Pinterest board or do a quick google search, there are a lot of fun ideas out there and it’s a great way to grow food in small spaces.

Raised Veggie Beds

This is a mix of cedar and galvanized metal raised bed garden I built for a client.

This is a mix of cedar and galvanized metal raised bed garden I built for a client.

Last but not least, well, for today, is the beloved raised beds. I’ve grown directly in the ground and in beds, and raised beds are by far my favorite. Raised beds are great for growing veggies because the environment and amount of weeding can be controlled more easily, plus they add dimension and interest to a garden. I grow everything from celery to lettuce to beans to tomatoes to herbs to edible flowers in raised beds. The type of beds I use depends on what I want to grow and what design style fits the area. I have begun using galvanized metal beds for plants like tomatoes, peppers, and eggplant that like the soil to stay a nice, warm, even temperature. I use lower, shallow beds for lettuces and lower, deeper beds (meaning the soil depth and health goes at least a 10-12 inches down) for root vegetables, like carrots and parsnips (radish, beets, and turnips don’t need as much depth but good, deep soil is always going to be good). Choosing your material for your raised beds depends on what you want to grow, how long you want the beds to last (e.g. cedar will last longer than fir), the growing space, and the design you want (if you’re unsure about this last part, let me know, I love to envision and design gardens!). Like container herb gardens, think about the veggies you currently have in your kitchen and like eating. Starting with what you already know you love to eat will make growing in and harvesting from those raised beds even better!

NOTE: Remember, good soil makes all the difference! When starting new beds I layer the ground base with cardboard (this helps keep weeds out plus will naturally compost down), add my own compost, layer with dried leaves and grass clippings, then fill to the top with compost from our local nursery. Over the season this will compound down and give you space to add mulch as needed, especially in the fall. Good soil will support a healthy, bio-diverse environment while giving your plants plenty of the nutrients they need. For established beds I add a layer of compost each spring and then mulch as needed.

10 Steps to Building A Galvanized Metal Raised Bed

IMG_E3467.JPG
2019-03-30 16.48.41.jpg

Raised beds are my favorite way to backyard garden. They create dimension, aesthetics, organization, and design to what might otherwise be a simple piece of grass or dirt. They also provide a way to have more control over your growing area, like being able to alter the pH or work as weed barriers. I continue to experiment with different types of raised bed designs, depending on the area of the yard or what I’m trying to grow.

A few months ago, I attended a seminar where the speaker described the pros and cons of different types of raised beds and containers. He briefly discussed the trend of using metal animal troughs and how they can support soil heat for growing crops that may have a variable success rate in the mild climate that I grow in. Metal beds are said to hold a more even temperature throughout the day as the soil absorbs the heat, and maintain a degree of that even when the temperatures cool down at night. Also, galvanized metal takes a long time before rusting and can be reused if the beds were taken apart. The possibility of more growing possibility with reusable materials hooked me!

Naturally this put me on a search for used animal troughs with the vision of having melons and squash growing in the yard as my motivation. I found there were few new or used to choose from, and they were expensive, so I decided to design and build my own. I chose to use a combination of cedar, for the durability, and galvanized metal, to create the heat bed I am hoping for.

Three Foot Bed

I designed the beds with an open bottom to create an environment where organic matter and little critters can move around in a natural, healthy ecosystem. However, this means that weeds and other plants can creep in to the growing area. To help keep the weeds out, I place cardboard down and then layer with yard compost, nursery compost, and top soil and/or mulch (not bark dust). I use the cardboard because it creates an environment where the weeds can’t survive, and within a growing season it will compost down and support the ecosystem I’m hoping for. I’m not a scientist, but I do know there is some science behind this process that ultimately is in support of the underground world and growing process.

So far, I have transplanted garlic into the smaller beds and am waiting for the starts to grow a little more before I transplant the tomatoes, peppers, onions, and basil in the big beds. I am looking forward to testing out these raised beds in my yard this year and hope you also get to have some fun trying out your own!

Below is a list of materials I used and the steps I took to build my beds. Some of the supplies, like the metal shears, you can find in my Tools list on Amazon. The beds (without any tool purchases) cost around $60 each.

2019-03-30 11.58.08.jpg
2019-03-30 12.01.23.jpg
2019-03-30 11.58.20.jpg
2019-03-30 12.01.31.jpg

Materials

  • Pen

  • Measuring Tape

  • Level

  • Gloves

  • Eye Protection

  • Sealant (I look for the lowest VOCs possible since water runoff will cause the chemicals to seep into your soil where your plants are growing and down into the reservoirs that eventually make their way out to our rivers and oceans)

  • Drill & Shears Attachment

  • Nail Gun (a variety of sizes will be helpful like framing, brad, and staple gun)

  • Nails and staples

  • Miter or Skill Saw

  • Shovel

  • Post Hole Digger

  • Wood (I used cedar for this project because it is one of the strongest woods I can find in my area. If you decide to go with a softer, less expensive wood like hem/fir, make sure to add several coats of sealant to extend its life and durability)

    • 4x4x8 (1 piece)

    • 1x4x8 (2 pieces for the Three Foot Bed, 4 pieces for the Six Foot Bed)

    • 1x2x8 (1 piece for the Three Foot Bed, 2 pieces for the Six Foot Bed)

  • Corrugated Galvanized Metal (roof panel style)

    • 3x8 (1 piece for the Three Foot Bed, 2 pieces for the Six Foot Bed)

  • Cardboard

  • Compostable Yard Debris

  • Compost

  • Top Soil or Mulch (not bark dust)

INSTRUCTIONS

The instructions below are for a Three Foot Bed, I have made notes of what to pay attention to if you are choosing to instead make the Six Foot Bed. The steps can be followed for any size of bed you want to build, you will just need to adjust the measurements accordingly.

2019-03-30 13.31.33.jpg

Step One

  • Cut the 4x4x8 pieces in 2’ sections (you will have four 2’ sections)

  • Three Foot Bed

    • For each of the 1x4x8 boards cut two 3 foot sections and two 1 foot sections (you will have a total of four 3 foot sections and four 1 foot sections)

  • Six Foot Bed

    • For each of the 1x4x8 boards cut one 6 foot section and one 2 foot section (you will have a total of four 6 foot sections and four 2 foot sections)

Step Two

  • Seal the boards using a low VOC, water repellent sealant (this step can also be done as Step One since the boards will need up to a day to dry)

2019-03-30 14.51.19.jpg
2019-03-30 15.16.07.jpg

Step Three

  • On the new 4x4x2 foot boards make a mark on each one at 18” (the remaining 6” will be set into the ground to help stabilize and level the bed) and lay them on a level area with the marks facing up

  • Nail one 1x4x1 (Three Foot Bed) or 1x4x2 (Six Foot Bed) foot boards to the 4x4x2 foot board, making sure it is flush on all sides

  • Line up the base of one of the 1x4x1 (Three Foot Bed) or 1x4x2 (Six Foot Bed) foot boards with the marks you made at 18 inches, making sure they also are flush with the edges of the 4x4x2 foot board and have an equal amount of difference from the top boards, secure these by nailing

  • Repeat this process for the other set of 4x4x2 and 1x4x1 (Three Foot Bed) or 1x4x2 (Six Foot Bed) foot boards

2019-03-30 15.18.24.jpg

Step Four

  • Place both of the sections you just created on their sides with the length of the bed between them (3 feet for the Three Foot Bed, 6 feet for the Six Foot Bed)

  • Place one of the 1x4x3 (or 1x4x6) foot boards near the top of both sides, make sure it is flush with all edges and secure by nailing

  • Place one of the 1x4x3 (or 1x4x6) foot boards flush with the side pieces measured at the 18 inches mark and secure by nailing

  • Repeat this process for the other set of 1x4x3 (or 1x4x6) foot boards

2019-03-30 15.21.09.jpg

Step Five

  • Measure the distance of the long ends of the inside part of the bed, for the Three Foot Bed the measurement should be at 26 ¾ inches

  • Measure the height of the distance between the top and base 1x4x3 (or 1x4x6) foot boards, this should be at 18 inches for both the Three Foot Bed and Six Foot Bed

  • On the corrugated galvanized metal measure two 18x26 ¾ (Three Foot Bed) or 18x62 ¾ (Six Foot Bed) inch areas, marking the space with a marker and using the level to draw out the lines, the corrugated ripples should be horizontal

  • Using the metal shears drill attachment (you can find in my Tools list on Amazon) cut the metal

Step Six

  • Measure the distance of the short ends of the inside part of the bed, these should be 4 ¾ (Three Foot Bed) or 14 ½ (Six Foot Beds) inches

  • You’ve already measured the height that should be 18 inches

  • On the corrugated galvanized metal measure two 18x4 ¾ (Three Foot Bed) or one 18x14 ½ (Six Foot Bed) inch area(s), marking the space with a marker and using the level to draw out the lines, the corrugated ripples should be horizontal

  • Using the metal shears drill attachment (you can find in my Tools list on Amazon) cut the metal

Step Seven

  • Secure each piece of the corrugated galvanized metal to the inside of the 1x4x3 (or 1x4x6 for Six Foot Bed) foot boards using the staple gun (I chose to use staples instead of nails since the wood was not very thick and the metal was thin)

  • Don’t worry if a little bit of the metal extends a little longer than your base board, you will be able to dig that area into the ground

2019-03-30 15.54.52.jpg

Step Eight

  • Measure the distance from the bottom of the 1x4x3 (or 1x4x6 on Six Foot Bed) foot top board and top of the base board, this should be around 11 inches

  • Cut the 1x2x8 foot board into eight pieces (Three Foot Board) or ten pieces (Six Foot Board)

  • Using the brad nail gun, secure these pieces to the outside areas where the galvanized metal meets the 4x4x2 foot boards, this will help secure the metal from bulging once filled with dirt and also adds some curb appeal

  • For the Six Foot Beds secure three pieces evenly across the long ends

2019-03-31 10.09.39.jpg

Step Nine

  • Identify the area you are going to place the bed

  • Measure the distance between all four 4x4x2 foot boards (legs) and mark the area

  • Using a post-hole digger (you can find in my Tools list on Amazon) dig 7-8 inch holes

  • Place the bed legs in the four holes and use the level to make sure the bed is balanced, dig deeper or fill in with dirt and rocks to create a level surface

  • Once level, fill the holes in with dirt (and rocks if you choose)

Step Ten

  • Line the bottom of the bed with cardboard, make sure to remove any plastic tape or labels

  • On top of the cardboard layer dried leaves, grass clippings, and other compostable yard debris

  • Fill in with a rich compost and top with either top soil or mulch

  • At this point you can start placing plants into the bed in the Three Foot Beds as long as you compact down the compost and top soil. For the Six Foot Beds it is best to wait at least a week for the yard debris to beak down and likely cause some extra space to add another layer of top soil or mulch to the top

These steps can be followed for any size bed you want to build, just make sure to put in enough 1x2 reinforcers on the outside of the long end of any bed to provide support and keep from bulging. Remember that these beds will hold in more heat than stone or wood-only beds, so you will want to monitor watering to make sure that the soil does not dry out. Have fun with your new raised beds and for joining me in this gardening adventure...let’s grow together!